Table
什麼是 Cache (快取) 介紹
Cache (快取) 的目的是節省網站的載入時間和流量,此篇文章會實作兩種 Cache 機制的方法:
1. Server 跟瀏覽器之間的 Cache 機制
當使用者第一次瀏覽網站時,可以讓瀏覽器將靜態檔案 (如:CSS、圖片檔、JS) 快取,當使用者第二次瀏覽時,圖片就可以直接從瀏覽器的快取裡面抓取。而這屬於 Server 跟瀏覽器之間的 Cache 機制,將會在第一部分 Nginx 如何設定 Cache 配置跟大家介紹。
2. Server side 的 Cache 機制
另外一種 Server side 的 Cache 是,當使用者第一次瀏覽網站的首頁時,Server 將首頁的資訊從資料庫撈出來後,並存在 Server 上的某個地方像是 Redis,當使用者第二次瀏覽首頁時,Server 直接從 Redis 快速的撈出來,不用再回資料庫重新計算,達到減輕關聯式或 NoSQL 資料庫的負載,和加速網站的載入速度。而關於如何實作 Server side 的快取機制,我們將會在第二部分 Flask 設定 Cache 和大家介紹。
一. Nginx 設定 Cache 配置
Nginx 提供 Module ngx_http_headers_module 模組,可以對 HTTP Response Header 的 Expires 和 Cache-Control 進行配置
方法一:使用 expires 配置 Cache
|
1 2 3 4 |
location ~* \.(jpg|jpeg|png|css|js)$ { expires 30d; proxy_pass http://backend; } |
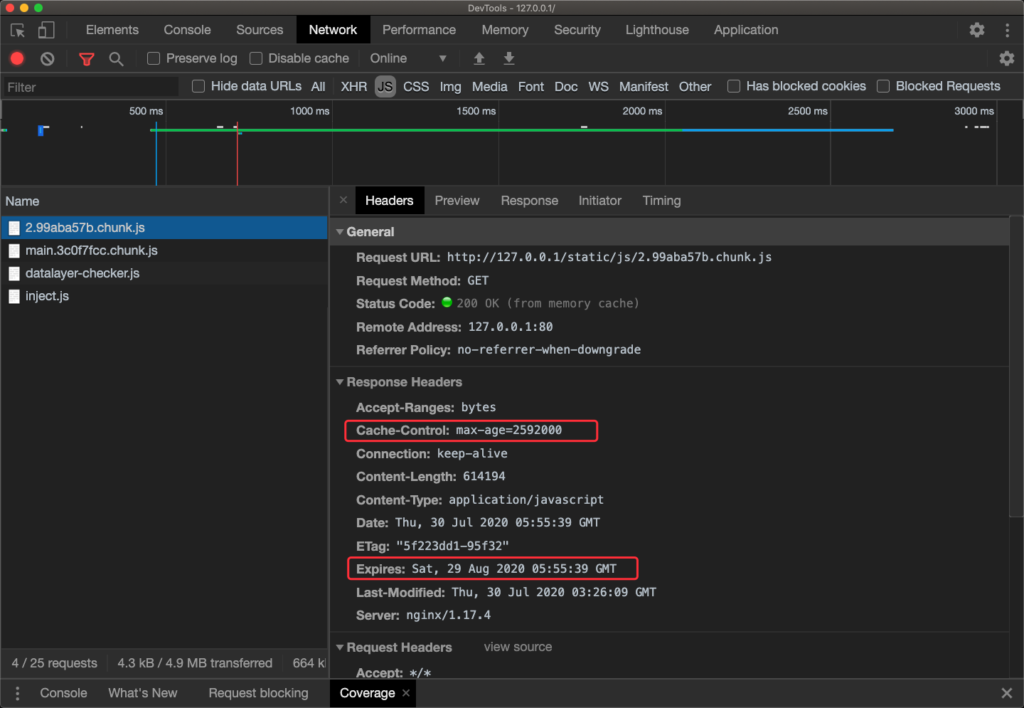
expires 常用的設定參數選擇如下:
- time:可以是 1d、1h、30m 或 30s
- max:將過期時間設為 10 年
- -1:即為永久過期
當設定 expires 30d; 最終結果如下圖,Cache-Control 和 Expires 都會被設定。

方法二:使用 add_header Cache-Control 配置Cache
|
1 2 3 4 |
location ~* \.(jpg|jpeg|png|css|js)$ { add_header Cache-Control max-age=31536000; proxy_pass http://backend; } |
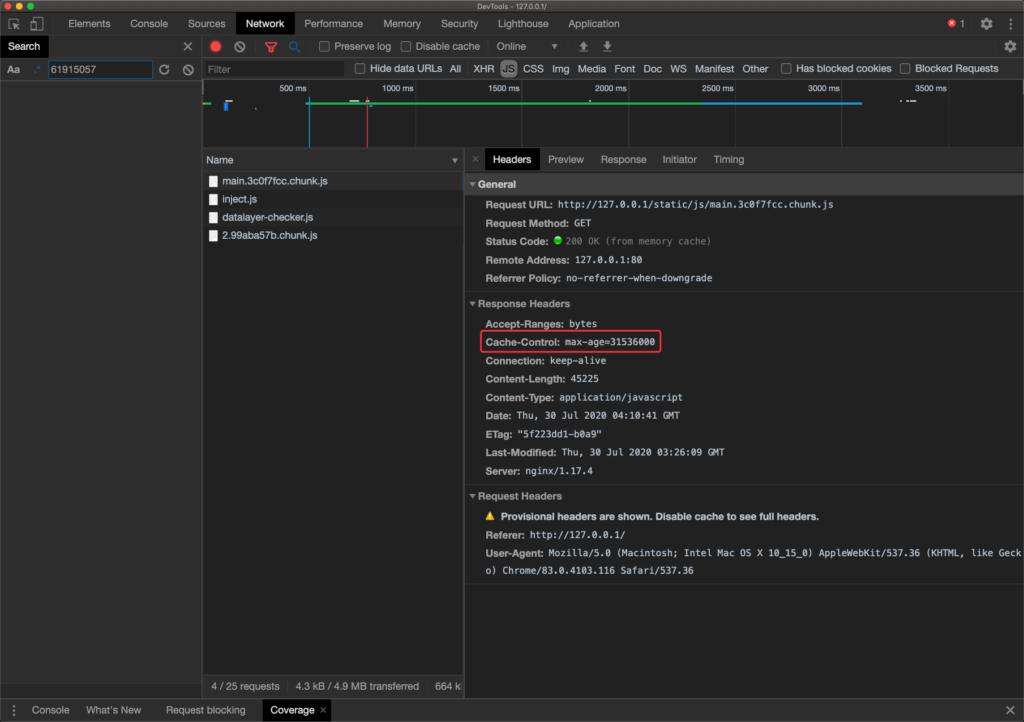
在 HTTP Response Header 裡面加上 Cache-Control: max-age= 31536000,就代表這個 Response 的過期時間是 365 天。未來使用者在收到 Response 後一年內會出被瀏覽器 Cache 住的現象。
最終結果如下圖,和方法一不同的是方法二僅有 Cache-Control 會被設定。

關於 Response Header 有關 Cache 機制,可以參考此篇:
關於 Nginx 設置 Cache 配置,可以參考以下文章:
- seo-使用 Cache-Control 在 nginx 解決 Serve static assects with an efficient cache policy 問題 | Happy Coding Lab
- Nginx下关于缓存控制字段cache-control的配置说明 – 运维小结 – 散尽浮华 – 博客园
二. Flask 設定 Cache
套件選擇和安裝 Flask-Caching
Flask 的 Cache 套件我們會選擇使用 Flask-Caching,原因很簡單這個套件目前 (2020年) 還有被維護,而且 Flask 作者也在 Patterns for Flask — Flask Documentation (1.1.x) 中推薦使用 Flask-Caching 套件,那就開始進入正題吧!
安裝套件 Flask-Caching:
|
1 |
$ pip3 install Flask-Caching |
import 套件:
|
1 |
from flask_caching import Cache |
選擇快取的方式
使用 Python dictionary 來進行快取
只需要在 config 將 "CACHE_TYPE": "simple" 設定成 simple,就會使用記憶體進行快取囉!要留意官方文件中有提到此方法 not really thread safe,關於 thread safe 安全的問題可以參考之前寫的這篇:【Python教學】淺談 GIL & Thread-safe & Atomic | Max行銷誌
|
1 2 3 4 5 6 7 8 9 10 11 |
from flask import Flask from flask_caching import Cache config = { "CACHE_TYPE": "simple", "CACHE_DEFAULT_TIMEOUT": 300 } app = Flask(__name__) app.config.from_mapping(config) cache = Cache(app) |
使用 redis 來進行快取
將 CACHE_TYPE 設定成 redis,並且搭配寫入 CACHE_REDIS_HOST 和 CACHE_REDIS_PORT
|
1 2 3 4 5 6 7 8 9 10 11 12 |
from flask import Flask from flask_caching import Cache config = { 'CACHE_TYPE': 'redis', 'CACHE_REDIS_HOST': '127.0.0.1', 'CACHE_REDIS_PORT': 6379 } app = Flask(__name__) app.config.from_mapping(config) cache = Cache(app) |
選填參數 CACHE_KEY_PREFIX :適用時機當多個 apps 共用同一個 memcached 的時候 (use the same memcached server for different apps),會在所有 keys 前加入 prefix 字詞。
|
1 2 3 4 5 6 7 8 9 10 |
cache = Cache() app1 = Flask(__name__) app1.config.from_mapping({"CACHE_TYPE": "redis", "CACHE_KEY_PREFIX": "foo"}) app2 = Flask(__name__) app2.config.from_mapping({"CACHE_TYPE": "redis", "CACHE_KEY_PREFIX": "bar"}) cache.init_app(app1) cache.init_app(app2) |
Flask Application 中使用快取
方法一:針對 template 進行快取
方法很簡單,新增 cached() 裝飾詞在 app.route 下方
|
1 2 3 4 |
@app.route("/") @cache.cached(timeout=50) def index(): return render_template('index.html') |
方法二:針對 function 進行快取
多了 key_prefix 的參數,如果 key 不存在快取中,key 和 key_value 將會被建立;反之如果 key 存在 Cache 中則此 key 的 key_value 則會被返回。
|
1 2 3 4 5 6 |
@cache.cached(timeout=50, key_prefix='all_comments') def get_all_comments(): comments = do_serious_dbio() return [x.author for x in comments] cached_comments = get_all_comments() |
方法三:使用 cache.memoize 方法
Memoization 的方法適用於,針對同一個 function,但會收到不同參數的 function 進行快取 (如下範例)
|
1 2 3 4 5 6 7 8 9 10 11 12 13 14 |
import random @cache.memoize(timeout=50) def big_foo(a, b): return a + b + random.randrange(0, 1000) >>> big_foo(5, 2) 753 >>> big_foo(5, 3) 234 >>> big_foo(5, 2) 753 (快取資料) >>> big_foo(5, 3) 234 (快取資料) |
|
1 2 3 4 5 6 7 8 9 10 11 12 13 14 15 16 17 18 19 20 |
from flask import request, redirect, abort, jsonify, json from flask_restful import Api, Resource, reqparse from ... import db, cache import random api = Api(api) class TagsModel(db.Model): @classmethod @cache.memoize(timeout=5) def get_count(cls, a, b): return int(a) + int(b) + random.randrange(0, 1000) class Count_number(Resource): def get(self): a = request.args['a'] b = request.args['b'] return TagsModel.get_count(a, b) api.add_resource(Count_number, '/count') |
清除 Flask 快取
|
1 |
cache.clear() |
最後~
▍回顧本篇 Flask Cache 文章:
- 什麼是 Cache (快取) 介紹
- Server 跟瀏覽器之間的 Cache 機制
- Server side 的 Cache 機制
- Nginx 設定 Cache 配置
- 方法一:使用 expires 配置 Cache
- 方法二:使用 add_header Cache-Control 配置Cache
- Flask 設定 Cache 機制
- 套件選擇和安裝 Flask-Caching
- 選擇快取的方式
- 使用 Python dictionary 來進行快取
- 使用 redis 來進行快取
- Flask Application 中使用快取
- 方法一:針對 template 進行快取
- 方法二:針對 function 進行快取
- 方法三:使用
cache.memoize方法
- 清除 Flask 快取
更多 Flask 教學相關閱讀:
▍關於 Flask 教學系列目錄:
▍關於 Flask 部署相關文章:
- 【Flask 教學系列】實作 GCP 部署 Flask + Nginx + uWSGI
- 【Flask 教學系列】實作 Flask + GitHub Action CI/CD
- 第一集:實作 Dockerfile + flask 教學 (附GitHub完整程式)
- 第二集:實作 Dockerfile + nginx + ssl + flask 教學 (附GitHub完整程式)
- 第三集:實作 Docker-compose (Flask+Nginx+PostgreSQL)
▍其他 Flask 相關教學:
- 【Flask教學系列】Flask 為甚麼需要 WSGI 與 Nginx
- 【Flask教學系列】Flask-SQLAlchemy 資料庫連線&設定入門 (一)
- 【Flask教學系列】Flask-JWT-Extended 實作
- 【Flask教學系列】實作 Flask CORS
- 【Flask教學系列】實作 Flask CSRF Protection
有關 Max行銷誌的最新文章,都會發佈在 Max 的 Facebook 粉絲專頁,如果想看最新更新,還請您按讚或是追蹤唷!
